Pabbly Connect is a platform to automate all your integrations. With Pabbly Connect, you can create automated workflows and transfer the data between your favorite apps and services without any manual efforts.
In this context you can integrate any application with KIRIM.EMAIL. So, you can transfer the data from all application you have used to KIRIM.EMAIL automatically.
In this tutorial, we will show you how to integrate form builder application with KIRIM.EMAIL, so you can get a subscriber list without transfer them one by one.
Before we start the tutorial, make sure you have signed up to Pabbly.
Set Up Application In Pabbly
1. Login to connect.pabbly.com

2. In Pabbly page, click “Create New Workflow” in the top right corner of the page.
3. Enter the Workflow Name, and click save.

4. You will be directed to the page where you have to set up the trigger and the action.
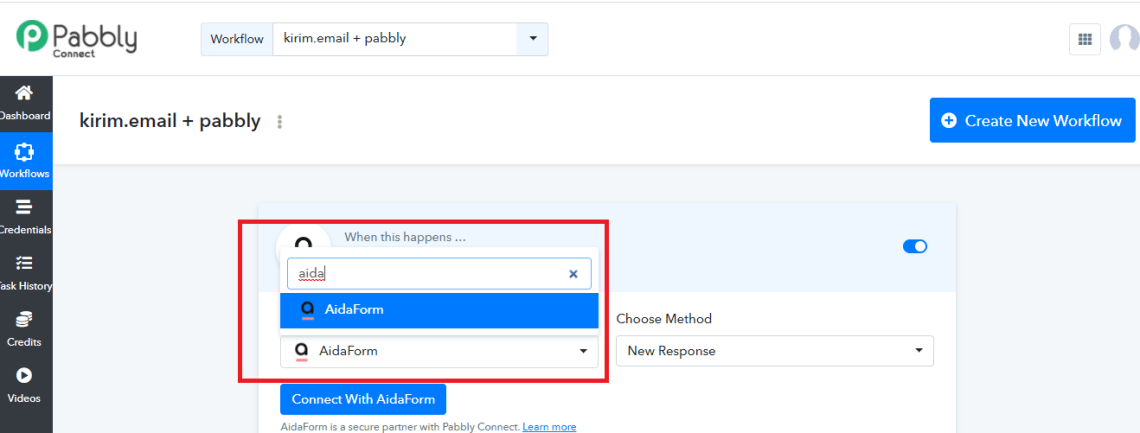
5. You have to pick one form builder application that you want to integrate with KIRIM.EMAIL. there are many form builder apps but here we use Aidaform. You can find you favourite apps in the column. So, we will transfer all the data from the apps to KIRIM.EMAIL subscriber list.

6. Click connect aidaform

7. Select the existing credential. If it does not appear on your screen you can insert the API manually. You can get the API code in your application setting. Copy and Paste it in the column.

8. In the form column, choose the form you want to integrate with KIRIM.EMAIL

9. Lastly, click Save and Send Test Request. You will see the appearance in the picture below. Pay attention to the full name and email address part. You will have to write these two answers in the KIRIM.EMAIL part later.


Set KIRIM.EMAIL In Pabbly
1. Next, you have to set KIRIM.EMAIL to integrate the application. Click the symbol “+” as shown in the picture below.

2. Choose KIRIM.EMAIL in the ‘choose app’ column.

3. Choose Add Subscriber in the ‘choose method’ column

4. Click connect and use the existing credential. If you cannot find one, you can get the username and rest API by clicking the button as shown below.

5. There are several column you must fill in. In the list section, fill in with the name of the list you made in KIRIM.EMAIL.

6. You can fill in Full name column and Email column by the answer in the trigger application.

7. Lastly, Save and Send Test Request. Done.
Now, both application is connected. All the data from Aidaform and KIRIM.EMAIL has been connected through Pabbly. To check it, you can go to the list in KIRIM.EMAIL and see that your subscriber list from Aidaform is transferred to KIRIM.EMAIL.

Hope this tutorial can help you to integrate your application with KIRIM.EMAIL. If you find any difficulties, please contact our support team at [email protected].
Good Luck