In the email system, it is very possible that other people can send an email with your business email address.
Suppose you have an email address [email protected]. Other people who are not on the KIRIM.EMAIL team can use that email address to send an email and abuse it. This is because the email recipient’s mail server cannot distinguish which e-mail was actually sent by KIRIM.EMAIL and which e-mail was forged by a third party.
So it is not surprising that there are many cases of phishing, spoofing, and spamming via email. The reason is that the e-mail address used to send the e-mail is genuine, so the e-mail recipient simply believes in the e-mail content. Though not necessarily the person who sent the email is part of the service provider they use. So that we don’t know who the person behind the email address is sending us an email.
Because the vulnerability in this email is so dangerous, a group of organizations came together and made technical specifications that aim to reduce the potential for email abuse using the email authentication protocol method.
From there, a term that we call DMARC appears. DMARC stands for DMARC Domain-based Message Authentication, Reporting, and Conformance. If we translate it into Indonesian, the meaning is more or less Domain-Based Message Authentication, Reporting, and Compliance.
At its core DMARC are an email protocol and reporting protocol designed to help ensure the authenticity of the sender’s identity. So that with this DMARC, the recipient’s mail server can distinguish which email we really send and which are not. The impact is that if we activate DMARC, our email will be more trusted by the recipient and it is likely that our email will no longer be marked as SPAM.
DMARC Settings In Cpanel To Avoid Incoming SPAM Emails
Given the importance of DMARC, on this page, we would like to provide a tutorial on how to set up DMARC in Cpanel to avoid SPAM. Please follow the steps below:
Please login to Cpanel
[/ su_box]In the DOMAINS section, click the Zone Editor icon.
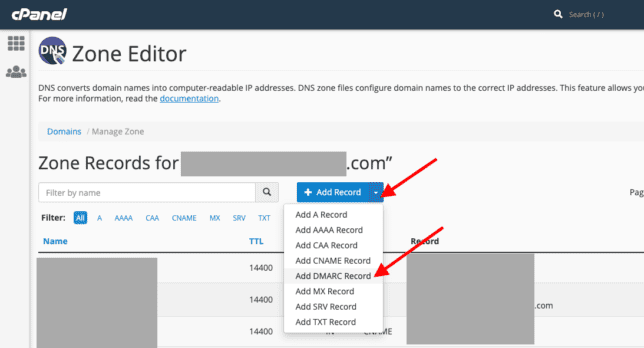
[/ su_box]On the Zone Editor page, select the domain you want to add a DMARC record to, then click the Manage menu.
Next, you will be directed to a page like an image below.
[/ su_box]
Then the system will generate DMARC automatically. At this stage what we need to focus on is the Policy section.
For those who have never added DMARC, please choose None.
For those of you who have added DMARC before and this policy, the section is in the Quarantine or Reject, please move it to None.
After that click the Add Record button. And DMARC record has been added successfully.
[/ su_box]Done.


